How to get started?
- 27 Sep 2024
- Print
- PDF
How to get started?
- Updated on 27 Sep 2024
- Print
- PDF
Article summary
Did you find this summary helpful?
Thank you for your feedback
To start using Bankfeed, follow these easy steps:
Install the Bankfeed app into your Dynamics 365 Business Central.
Assign Permission Sets to Bankfeed users.
Create an account and connect bank accounts using the Assisted Setup “Set up Bankfeed Connection”.
For the Bankfeed users, change the role to Accountant.
How to Install the Bankfeed app?
There are two ways to install the Bankfeed app. Here is a manual for both methods; choose the one you prefer.
- The first way to install Bankfeed is through your Dynamics 365 Business Central Extension Marketplace without using external links or websites.
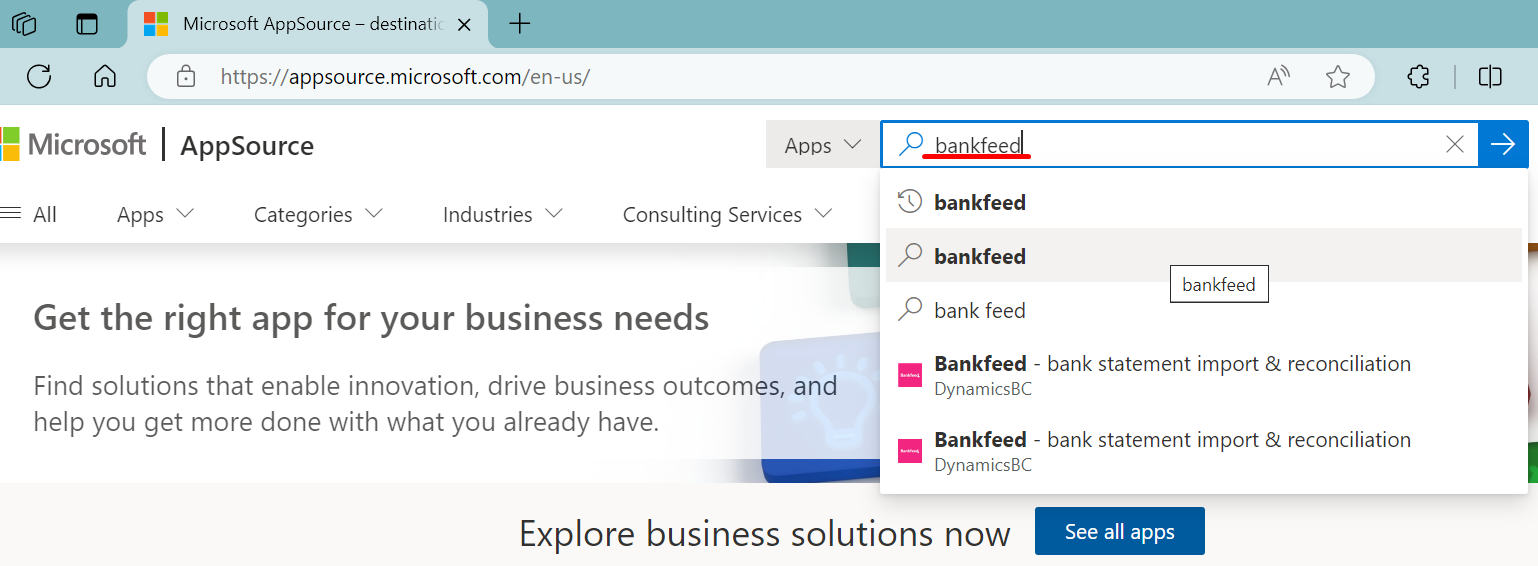
In the Business Central Search, enter Extension Marketplace.

When the page opens, enter Bankfeed in its Search.

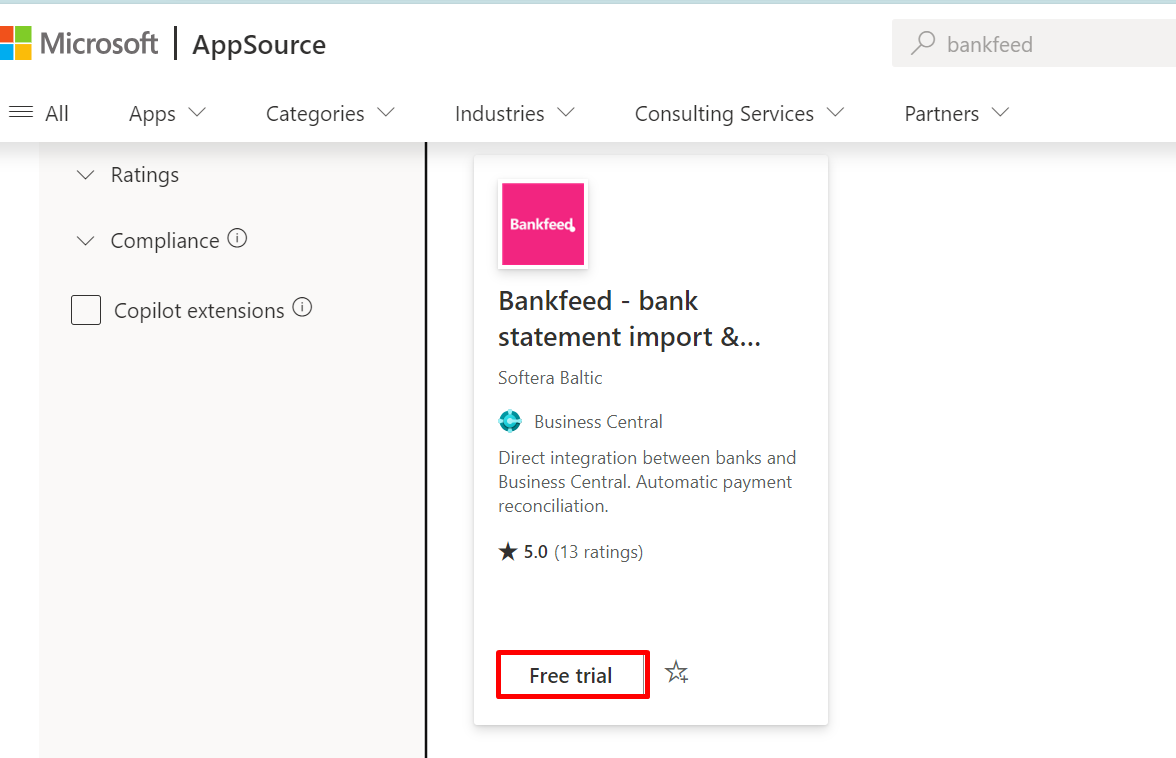
Click on the Free trial button.

Confirm by clicking Free trial to continue.
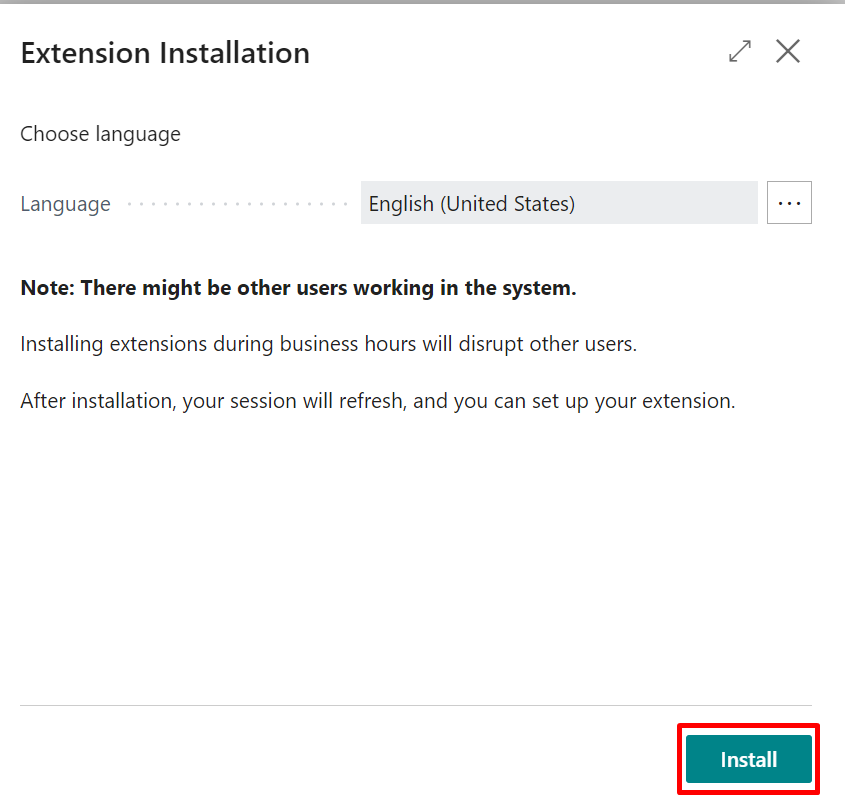
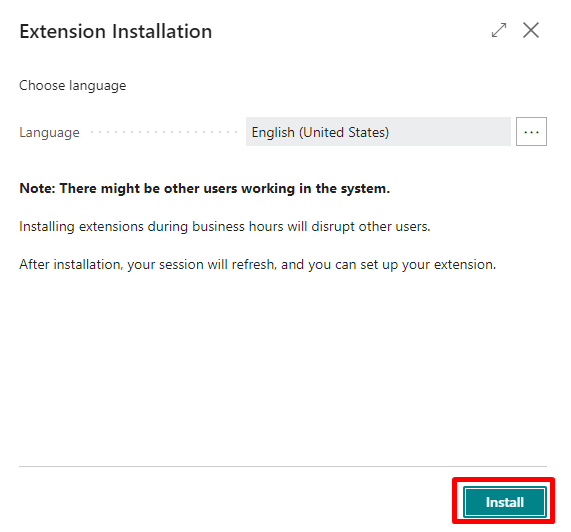
Choose the installation language and click Install.
The installation process may take a few minutes. Once done, you will get a confirmation message.
- Another way to install Bankfeed is through Microsoft AppSource. Open the link, and in Search, enter Bankfeed.
Click on the Free trial button.
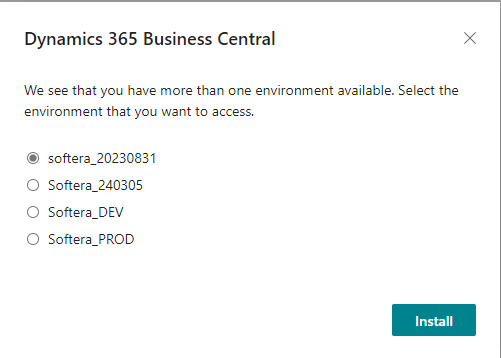
Select the environment where you want the Bankfeed app installed and click Install.
Choose the installation language and confirm by pressing the Install button.
The installation process may take a few minutes. Once done, you will get a confirmation message.
The Bankfeed installation link can also be accessed through the Bankfeed webpage - just click on the Get it from Microsoft AppSource button.

What permission sets are needed for Bankfeed?
If a user working with Bankfeed does not have the SUPER permission set, these Bankfeed permission sets must be assigned.

Information
These Permission sets allow you to use Bankfeed without any limitations.
How to set up Bankfeed and connect bank accounts?
Bankfeed has an Assisted Setup that helps users make the main set up and connect bank accounts by themselves. With it, the user does not have to open several different Business Cental setup pages or create an account on external web pages; everything can be done in one setup form.
The Bankfeed Assisted Setup run-through can be viewed in this Video.
If a more complicated setup or some modifications after the Assisted Setup are needed, this manual will explain all setup pages in detail.
To run the asssisted setup, find it in the Assisted Setup list, by searching for "Set up Bankfeed Connection".

First, you get a welcome message; click Next.

On this page, in the Journal Type field, you must select the journal you want to use for the statement import. The selections are General Journal or Payment Reconciliation Journal.
If you select the Payment Reconciliation Journal, you do not need to select anything else; click Next.
If you select the General Journal, you must also select the Journal Template Name. Also, select whether you want to import all bank statement transactions or Skip Vendor Payments.
Click Next.

Bankfeed setup is done and the solution is ready to use.
Click Finish.
Now, the bank account connection starts.

Click Next.

Select Environment type - select which Environment you prefer to use. Choose Sandbox if you want to connect Demo bank accounts and get DEMO bank transactions. Select Production if you want to connect real bank accounts and get actual bank transactions.
Select Starting Date - enter the date from which you want to receive bank transactions. Bankfeed can retrieve transactions from 24 months ago.
Select Country Code - by default, it is filled with the Country/Region Code from the Company information. It can be changed if needed.
When you have filled in all the information, click Next.

Click on the green area "Link account".

Search for the Bank institution you need, or select from the list.

Click Continue to login.

Continue with the required bank authentication process. It may be different depending on the bank.
If you are connecting to the Sandbox and need to enter your User and Password information, use "user_good" and "pass_good."
In the connection process, select the bank accounts you want to connect.

You will get a "Success" message if the connection is successful. Click Continue.

You must link connected bank accounts with existing Business Central Bank account cards when the connection ends.
Click Close, when finished.

Click Next.

Click Finish.

Assisted setup is done. Bankfeed is ready for use.
If you want to connect to another bank institution, run the same assisted setup, "Set up Bankfeed Connection," one more time.
Why should Bankfeed users consider changing their role to Accountant?
The standard Dynamics 365 Business Central Accountant role was supplemented with additional actions, pages and functions, allowing Bankfeed users to access the necessary information and see critical notifications instantly.
To change your role, go to My Settings and select Accountant.
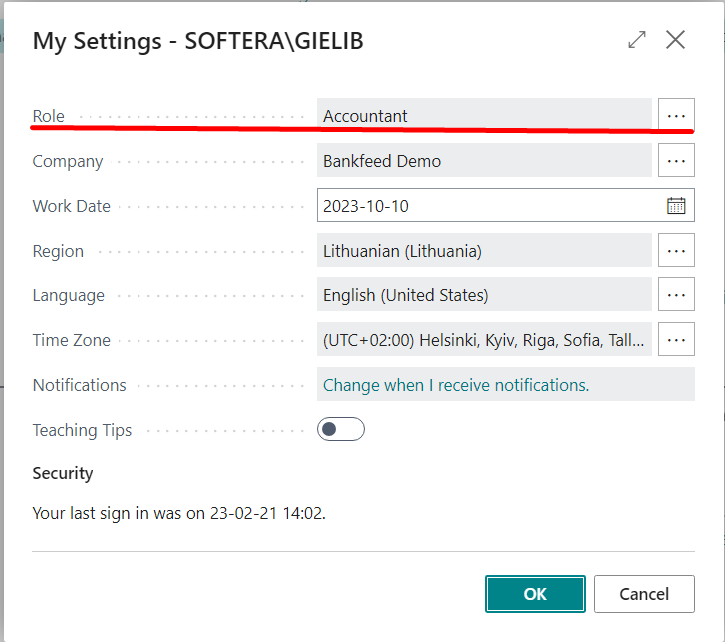
The Bankfeed section was added to the Actions bar. If you expand it, you will find all Bankfeed pages in one place.

In the Activities area you will find Bankfeed pages, notifications and other information:

Connected Bank Accounts – shows how many bank accounts are connected to Bankfeed.
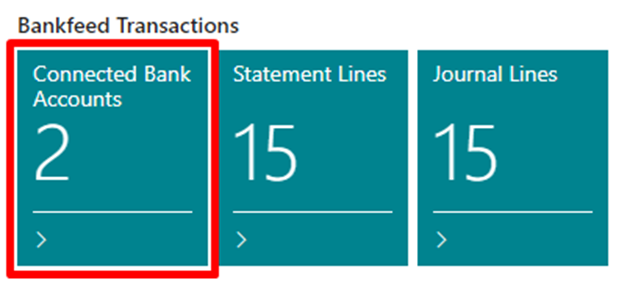
If you click the number, you will see the detailed information about the connected bank accounts.

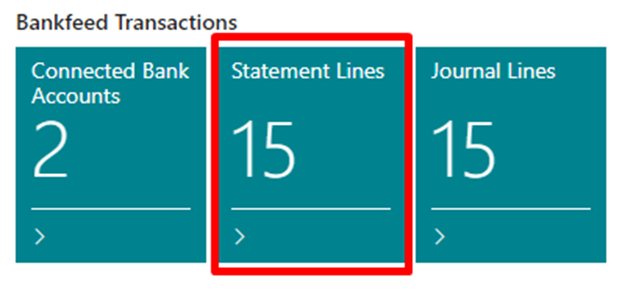
Statement Lines – shows how many unposted Statement lines are uploaded. If you click on it, the “Statement Lines (Bankfeed)” page will open.
Journal Lines - shows how many unposted transactions are in the journals. Which journal lines will be calculated (payment, cash receipt, payment reconciliation) depends on the journal chosen in the assisted setup.
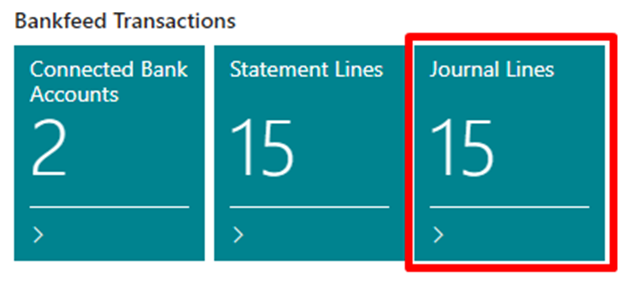
By clicking the number, you will open the list of the journal batches (if more than one journal batch is used).
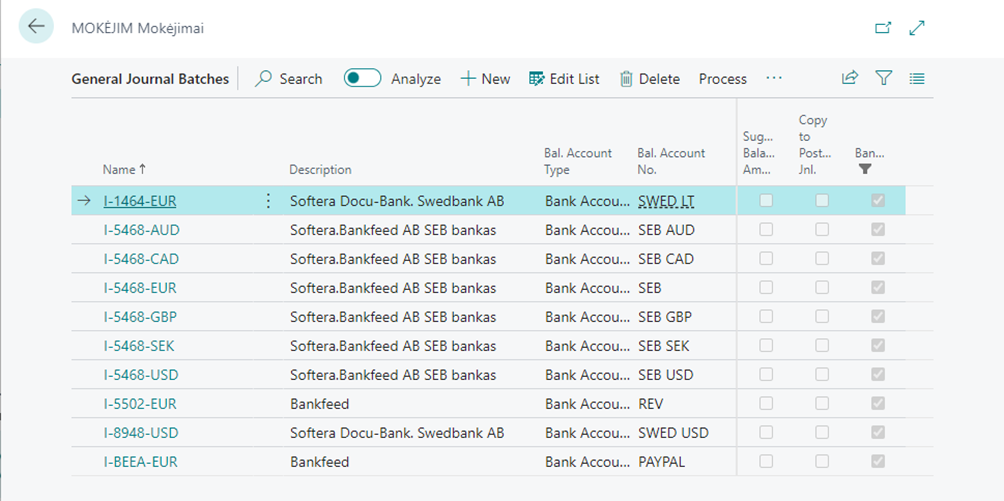
Only Bankfeed journal batches are shown.
Bankfeed Errors Today
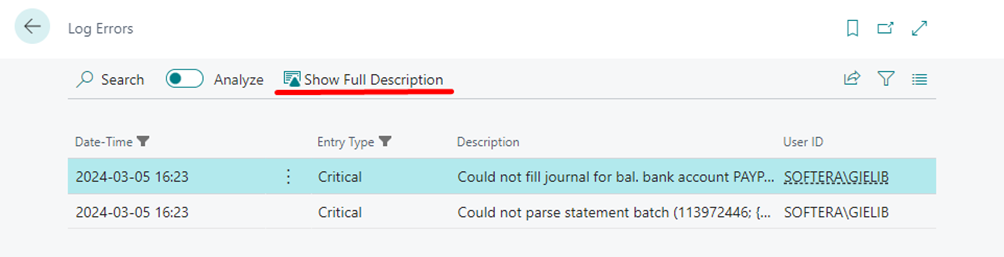
Log Errors – sshows how many errors the function “Process statement batches (Bankfeed)” had today.

By clicking on it, you will open the “Log Errors” page and will see all the detailed information about the errors that occurred.
Job Queue Log Errors – shows how many errors the Job queue entry, which runs the function “Process Statement Batches”, had today. If you click on it, the job queue log entries with detailed information will open.

Bankfeed Process
Process Statement Batches – this button will run the “Process Statement Batches (Bankfeed)” function.

Bankfeed History
Posted Statement Lines – this button will open the “Posted Statement Lines (Bankfeed)” page.


Bankfeed Setup
Setup List – this button will open the list of all Bankfeed setups in one place.


Bankfeed Help
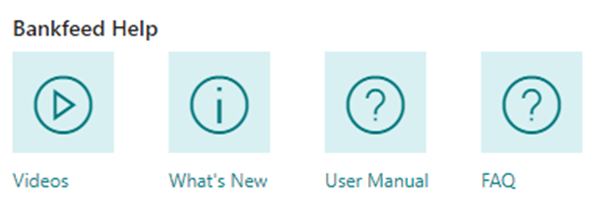
• Videos – how-to videos are here;
• What's New – link to What’s New documentation;
• User Manual – link to Bankfeed user manuals;
• FAQ – link to the frequently asked questions.
Information
Using Personalization, you may hide unwanted Bankfeed areas from your Role Center.
%20(120%20%C3%97%2045px)%20(3).png)