Laiškų siuntimas per SMTP naudojant OAuth 2.0 (Galioja nuo 2026 m. Kovo 1 d.)
Microsoft nutraukia BASIC autentifikavimą SMTP (SMTP AUTH – Client Submission) Exchange Online aplinkoje.
BASIC autentifikavimas SMTP bus:
- pradėtas riboti nuo 2026-03-01
- visiškai išjungtas nuo 2026-04-30
Instrukcija skirta Jūsų įmonės IT BC globaliam administratoriui. Ši instrukcija aprašo, kaip sukonfigūruoti SMTP laiškų siuntimą su OAuth 2.0 autentifikacija, naudojant PowerShell skriptus ir vėliau šią konfigūraciją pritaikyti Microsoft Dynamics 365 Business Central nuo 27.2
1. Nustatymams atlikti reikės šių PowerShell skriptų:
01-GRAPH.ps1 01-GRAPH.ps1
Atsakingas už:
-
App Registration sukūrimą
-
App nustatymus
-
Enterprise Application (Service Principal) sukūrimą
-
Reikalingų konfigūracijų eksportą į .json failą
02-EXO.ps1 02-EXO.ps1
Atsakingas už:
-
Pašto dėžutės (mailbox) konfigūraciją
-
Enterprise Application (Service Principal) priskyrimą pašto dėžutei
RunBoth.ps1 RunBoth.ps1
Atsakingas už:
-
Abiejų skriptų (01-GRAPH.ps1 ir 02-EXO.ps1) paleidimą
-
Skriptai paleidžiami atskirai tam, kad nesusilaužytų DLL dėl skirtingų, bet tuo pačiu metu naudojamų modulių
**Visus šiuos skriptus reikia parsisiųsti ir sudėti į vieną aplanką. **
2. Reikalingi pakeitimai skriptuose
RunBoth.ps1
Reikia pakoreguoti šiuos kintamuosius:
$AppDisplayName = "BC SMTP OAuth" <- App Registration pavadinimas – nėra kritiškai svarbus.
$MailboxUpn = "SMTPvartotojas@domain.com" <- Pašto dėžutė, kuri bus naudojama SMTP laiškų siuntimui.
$OutJson = "C:\Work\SMTP\smtp_oauth_output.json"
Kelias, kur bus eksportuojamas .json failas su visais reikalingais duomenimis Business Central konfigūracijai.
$BcRedirectUri = “https://businesscentral.dynamics.com/OAuthLanding.htm” palikti šitą jeigu SaaS (Cloud)
Jeigu OnPremise BC27.2+ tada reikia pakeisti į:
$BcRedirectUri = https://domenas/BCServisoPavadinimas/OAuthLanding.htm (p.s. privalo būti SSL pririštas https, netinka http)
3. Reikalavimai
Teisės
Global Administrator teisės tenant’e, kuriame:
-
Kuriamas App Registration
-
Konfigūruojama SMTP pašto dėžutė
PowerShell moduliai
Reikia įdiegti šiuos modulius:
-
Install-Module Microsoft.Graph -Scope CurrentUser
-
Install-Module ExchangeOnlineManagement -Scope CurrentUser
PowerShell versija
-
PowerShell 7+ https://learn.microsoft.com/en-us/powershell/scripting/install/install-powershell-on-windows?view=powershell-7.5
-
PowerShell 5 gali neveikti dėl modulių suderinamumo
4. Skriptų paleidimas
Sutvarkius visus kintamuosius:
-
Atidaryti PowerShell 7 (arba bet kuris redaktorius, kuris turi pluginą Powershell (VSCode, Notepad++, JetBrains)
-
Atsidaryti aplanką, kuriame yra visi 3 skriptai
-
Sutvarkyti kintamuosius ir paleisti pradžiai (suteikia leidimą sesijai vykdyti powershell skriptus, jeigu išjungti leidimai): Set-ExecutionPolicy -ExecutionPolicy Bypass -Scope Process
5. Paleisti
.\RunBoth.ps1
Proceso metu:
-
Du kartus reikės prisijungti (Microsoft Graph ir Exchange Online)
-
Sekti PowerShell arba VS Code pateikiamas instrukcijas
.jpg)
Pasibaigus turi taip atrodyt:
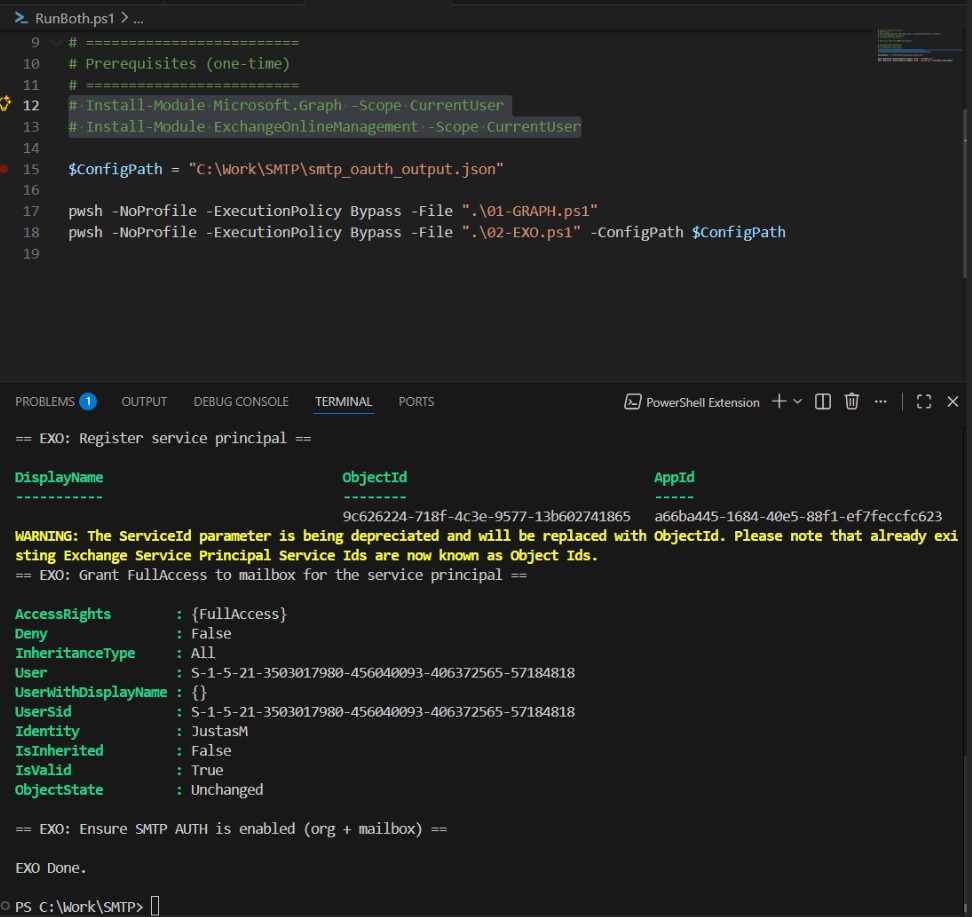
Sėkmingai pasibaigus skriptų darbui:
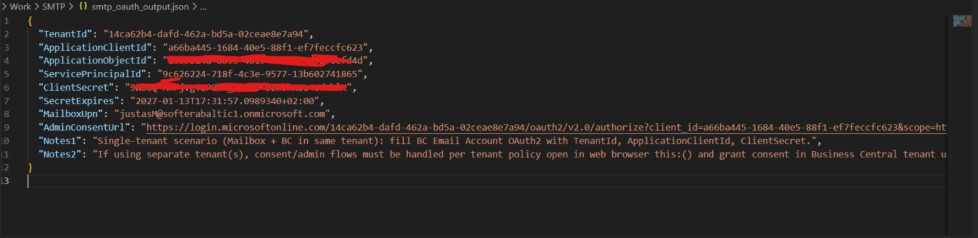
- Nurodytoje vietoje turi atsirasti failas:
smtp_oauth_output.json
Šiame faile bus visa reikalinga informacija Business Central SMTP OAuth konfigūracijai:
-
Client ID
-
Client Secret
-
Tenant ID
-
SMTP vartotojo informacija
6. Business Central konfigūracija (Cloud)
Veiksmai Business Central sistemoje:
- Eiti į Email Accounts
Pasirinkti:
- Add an email account → SMTP
Užpildyti laukus:
-
Account Name – bet koks (pvz. algalapiai)
-
Sender Type – galima palikti Specific
-
Sender Name – pvz. Algalapiai
-
Email Address – SMTP pašto dėžutė (turi sutapti su .json kintamasis MailboxUpn)
Paspausti:
- Apply Office 365 Server Settings
Authentication:
- Pasirinkti OAuth 2.0 (vietoje BASIC)
Toliau:
- Next → Use custom app registration → Next
Užpildyti iš smtp_oauth_output.json:
-
Client Id → ApplicationClientId
-
Client Secret → ClientSecret
-
Tenant ID → TenantId
Išmes lentelę patvirtinti App Registration, patvirtinam ją su Business Central globaliu administratorium.
Next → galima siųsti testinį laišką ir patikrinti veikimą.
EN
Sending Emails via SMTP Using OAuth 2.0 (Valid from March 1, 2026)
Microsoft is discontinuing BASIC authentication for SMTP (SMTP AUTH – Client Submission) in the Exchange Online environment.
BASIC authentication for SMTP will be:
-
gradually restricted starting 2026-03-01
-
completely disabled starting 2026-04-30
This document describes how to configure SMTP email sending using OAuth 2.0 authentication with PowerShell scripts and how to apply this configuration in Microsoft Dynamics 365 Business Central (version 27.2 and later).
1. To complete the setup, you will need the following scripts:
01-GRAPH.ps1
01-GRAPH.ps1
Responsible for:
-
Creating an App Registration
-
Configuring application settings
-
Creating an Enterprise Application (Service Principal)
-
Exporting the required configuration data to a .json file
02-EXO.ps1
Responsible for:
-
Configuring the mailbox
-
Granting the Enterprise Application (Service Principal) access to the mailbox
RunBoth.ps1
RunBoth.ps1
Responsible for:
-
Running both scripts (01-GRAPH.ps1 and 02-EXO.ps1)
-
Scripts are executed separately to avoid DLL conflicts caused by different but similarly named modules
All three scripts must be downloaded and placed into the same folder.
2. Required Script Configuration
RunBoth.ps1
The following variables must be adjusted:
$AppDisplayName = "BC SMTP OAuth Scriptas 2"
App Registration display name – not critically important.
$MailboxUpn = "SMTPvartotojas@domain.com"
The mailbox that will be used for SMTP email sending.
$OutJson = "C:\Work\SMTP\smtp_oauth_output.json"
Path where the .json file with all required Business Central configuration values will be exported.
$BcRedirectUri = "https://businesscentral.dynamics.com/OAuthLanding.htm"
Keep this value when using Business Central SaaS (Cloud).
For Business Central On-Premise (BC 27.2 or later), the redirect URI must be changed to:
$BcRedirectUri ="https://yourdomain/BCServiceName/OAuthLanding.htm" Note: HTTPS (SSL) is mandatory - HTTP is not supported.
3. Prerequisites
Permissions
Global Administrator permissions in the tenant where:
-
The App Registration is created
-
The SMTP mailbox is configured
PowerShell Modules
The following modules must be installed:
-
Install-Module Microsoft.Graph -Scope CurrentUser
-
Install-Module ExchangeOnlineManagement -Scope CurrentUser
PowerShell Version
-
PowerShell 7 or later https://learn.microsoft.com/en-us/powershell/scripting/install/install-powershell-on-windows?view=powershell-7.5
-
PowerShell 5 may not work due to module compatibility issues
4. Running the Scripts
After configuring all required variables:
-
Open PowerShell 7 (or any editor that has a PowerShell plugin, such as VS Code, Notepad++, or JetBrains IDEs)
-
Navigate to the folder containing all three scripts
-
Before running RunBoth.ps1, open PowerShell 7 and execute:
Set-ExecutionPolicy -ExecutionPolicy Bypass -Scope Process
This is required because Windows may block script execution by default (for this session).
5. Run
.\RunBoth.ps1
During execution:
-
You will need to authenticate twice (Microsoft Graph and Exchange Online)
-
Follow the instructions displayed in PowerShell or VS Code
.jpg)
After successful execution:
.jpg)
After successful execution:
- The following file must be created in the specified location:
smtp_oauth_output.json
This file contains all required information for Business Central SMTP OAuth configuration:
-
Client ID
-
Client Secret
-
Tenant ID
-
SMTP mailbox information
.jpg)
6. Business Central Configuration (Cloud)
Steps in Business Central:
- Go to Email Accounts
Select:
- Add an email account → SMTP
Fill in the fields:
-
Account Name – any value (e.g., Payroll)
-
Sender Type – can be left as Specific
-
Sender Name – e.g., Payroll
-
Email Address – SMTP mailbox (must match the .json file MailboxUpn)
Click:
- Apply Office 365 Server Settings
Authentication:
- Select OAuth 2.0 (instead of BASIC)
Continue:
- Next → Use custom app registration → Next
Fill in values from smtp_oauth_output.json:
-
Client ID → ApplicationClientId
-
Client Secret → ClientSecret
-
Tenant ID → TenantId
Popup for App Registration approval; we approve it with Business Central global administrator
Click Next and send a test email to verify functionality.