As you already know, almost all setup is done using the Assisted setup "Get Started with Bankfeed." Still, in case you need a more advanced setup or want to change something, this manual section provides a detailed description of Bankfeed's setup pages.
Integration Setup (Bankfeed)
Basic product settings are stored in this "Integration Setup (Bankfeed)" page.
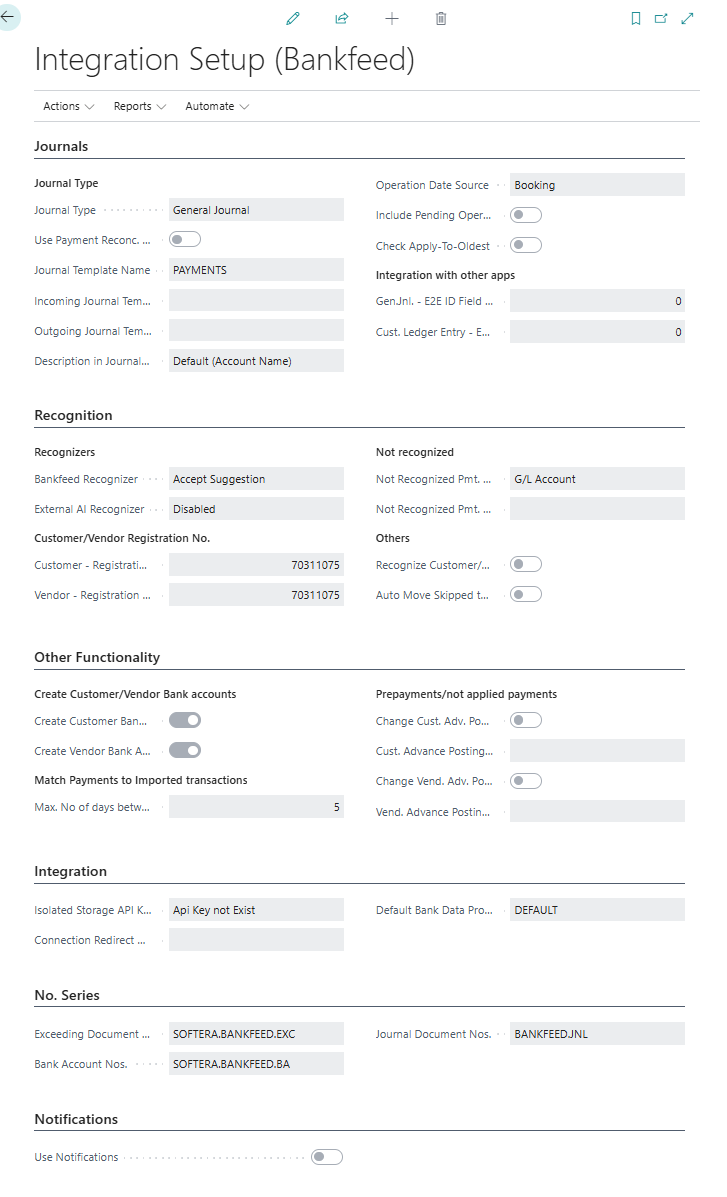
Description of the most important fields:
| Field | Description |
|---|---|
| Fastab Journals. Setup in this fastab is related to journal lines. | |
| Journal Type | Select which journal you want to use for Bankfeed transaction import. Selections are: General Journal, General Journal split by Credit/Debit and Payment Reconciliation Journal. |
| Use Payment Reconc.Journal | Select if you want transactions to be imported to Payment Reconciliation Journal instead of Payment/Cash Receipt journal. Importing bank statement to Payment reconciliation journal Bankfeed does not apply any recognition or application. It is done by standard BC functionality. |
| Journal Templates Name | Specifies the payment journal template to which transactions should be imported. This field must by filled when the Journal Type was selected "General Journal". |
| Incoming Journal Templates Name | Specifies the general journal template to which incoming/credit transactions should be imported. This field must by filled when the Journal Type was selected "General Journal split by Credit/Debit". |
| Outgoing Journal Templates Name | Specifies the general journal template to which outgoing/debit transactions should be imported. This field must by filled when the Journal Type was selected "General Journal split by Credit/Debit". |
| Description in Journal from | Select what you want to fill in journal field Description. Available values: Default (account name) - it is used the standard BC journal field Description. The account name is filled in according to the assigned Account No. in the journal line. For example, if you assign Customer No. P0003, the description will contain its name. Payer Information - in this case the information from the Payer Information field will be filled in the Description. If you change the Account No. in journal line, the Description will remain the same. Message to Recipient - in this case, the information from the Message to Recipient field will be filled in the Description. If you change the Account No. in the line, the Description will remain the same. |
| Operation Date Source | Specify which date from bank transaction should be filled to Statement lines "Book date" or "Value date". Default value is Booking. |
| Include Pending Operations | Specifies whether statement lines should be created for pending operations, such as Credit card payment and etc. It is recommended not to include by default, as it may result duplicated transactions. |
| Check Apply-To-Oldest | Select this setup if you are using the "Apply-To-Oldest" application method and want applications made with it. If not marked, Bankfeed will apply to the found documents, not based on the application method. |
| Gen.Jnl. – E2E ID Field No. | Specify the field number in the general journal to which the information from the EndtoEnd ID field should be uploaded. Is used only together with the ECOM or other products. |
| Cust. Ledger Entry – E2E ID Field No. | Specify the field number in the customer ‘s ledger entries where the value of the EndToEnd ID field should be stored after posting. Is used only together with the ECOM or other products. |
| Fastab Recognition. Setup related to journal lines recognition. | |
| Recognizers "Bankfeed Recognizer" | Here you can control Bankfeed Recognizer and its results. |
| * If you want to turn off the Bankfeed recognizer, select "Disable". | |
| * If you want only to run Bankfeed recognition, but not to assign its results to the lines, you can select "Run Recognizer". | |
| * If you want to run Bankfeed recognition and to accept it's suggestion, select "Accept Suggestions". | |
| Recognizers "External AI Recognizer" | Here you can control External AI Recognizer and its results. |
| * If you want to turn off External AI recognizer, select "Disable". | |
| * If you want only to run External AI recognition, but not to assign its results to the lines, you can select "Run Recognizer". | |
| * If you want to run External AI recognition and to accept it's suggestion, select "Accept Suggestions". | |
| Customer – registration No. field No. | This field specifies which field is used for the Customer‘s company code. It can be a standart BC field or a custom field value. |
| Vendor – registration No. field No. | This field indicates which field is used in the system for the Vendor‘s company code. It can be a standard BC field or a custom field value. |
| Not Recognized Pmt. Acc. Type | Specifies the type of account that must be assigned in lines where the account is not identified. The default value is G/L Account. |
| Not Recognized Pmt. Acc. No. | Specifies the account number to be assigned to the lines where the Account No. It is not identified. You can also leave the field blank to see an empty value in Account No. field in unrecognized lines. The default value is Blank. |
| Recognize Customer/Vendor by Transaction Type | This setup is commonly used when a company has many customers and vendors who are the same company. Select whether the transaction type (debit, credit) should decide to recognize either customer or vendor. When disabled and both customer and vendor exist with the same company details, nothing will be recognized. |
| Auto Move Skipped to Posted | Select this setup if you want journal lines marked as "Skip posting" to be automatically transferred to Posted Statement lines. If it's not marked, journal lines must be transferred to Posted Statement lines using the "Move Skipped lines (Bankfeed)" function. |
| Fastab Other Functionality. | |
| Create Customer Bank Accounts | Select if you want to create new customer bank account cards while recognizing customers if they do not yet exist in BC. |
| Create Vendor Bank Accounts | Select if you want to create new vendor bank account cards while recognizing vendors if they do not yet exist in BC. |
| Max. No of days between payment initiation and finalization | Number of days tolerated between payment made in BC and the same transaction in Bank statement. Default value is 5days. |
| Change Cust.Adv.Post.Group | Select if you want to change customer posting group in journal lines which are not applied. |
| Cust.Advance Posting group | Select Customer posting group to which not posted lines should be changed. |
| Change Vend.Adv.Post.Group | Select if you want to change vendor posting group in journal lines which are not applied. |
| Vend.Advance Posting group | Select Vendor posting group to which not posted lines should be changed. |
| Fastab Integration. | |
| Isolated Storage API key | In this field, we indicate if the API keys exist. |
| Connection Redirect URL | Specifies the URL where the bank web page is redirected after a successful bank account connection. This should be the OAuthLanding.htm page of the web client URL. Leave empty if the standard value from the service configuration should be used. |
| Fastab No. Series. | |
| Exceeding Document Nos. | In this field default No. series for exceeding maximum length Transaction ID is set. If the Transaction ID is too long, this no series will be used. |
| Bank Account Nos. | If it is selected Create Customer Bank Accounts and/or Create vendor Bank Accounts, new created bank account cards fill be using this number series. It can be changed if needed. |
Setting Up Job Queue Entries for Automatic Recurring Bank Transaction Uploads
Bank transactions can be imported into the system manually; however, using job queues for automatic import is much more efficient and beneficial.
The Job Scheduler managing all the recurring tasks is enabled when the Bankfeed is installed. This Job Scheduler creates new Job Queue entries for the current day every day at a particular time.
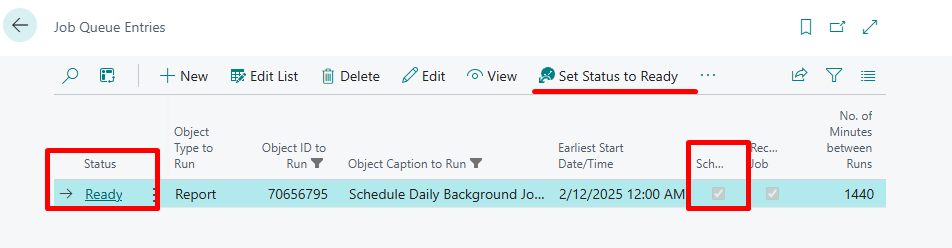
For this Scheduler to run, its Status should be set to "Ready" and marked as"Scheduled." If it's not, click "Set Status to Ready," and it will start running its daily jobs.
It's important to ensure that Job Scheduler would be Starting between 00.00 AM and 01.00 AM.
If, for some reason, you do not see the Scheduler job in the Job Queue Entries, you can create it manually or use a function.
To run the function open Integration Setup (Bankfeed) > Actions > Daily Background Jobs.
On the opened page, click Actions > Create Scheduler Job.

The Scheduler prepares the Job Queues to run different jobs every day. These jobs are:
- Uploading Bank Transactions,
- Updating Bank Balances,
- Refreshing connected bank account list.
If you want to adjust the running times or the number of times the functions run, you can do it on the same page: Daily Background Jobs.
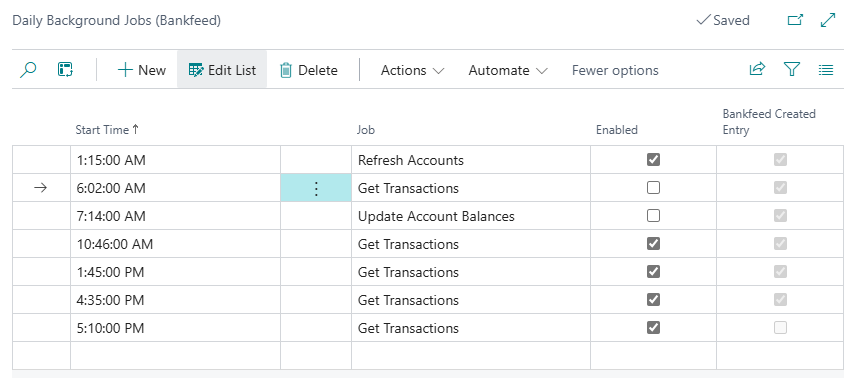
Here you can Disable the lines you don't need, to add the new ones, or to modify the Start Time.
Setting up Automatic Bankfeed Journal Batch Posting
If you want to automatically post Journals with Bankfeed, you can achieve this with the function “Post Journal Batches (Bankfeed).” This function can be scheduled on Job queue entries and can post predefined Journal batches.
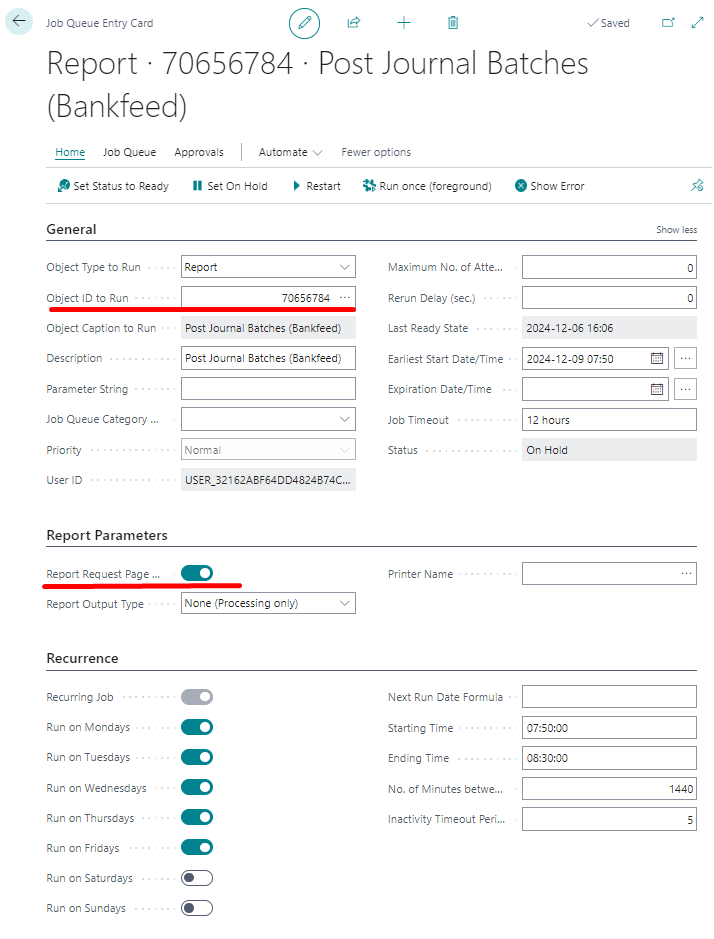
On the function Request Page, it's important to put the right filters in order to prevent posting all lines in all journal batches.
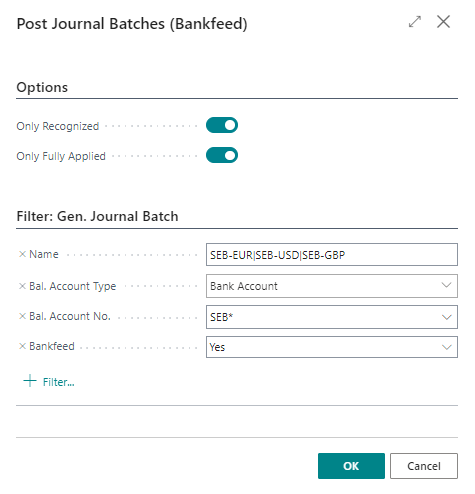
Select, which journal lines you want to post:
- Only Recognized - journal lines that are partially or fully recognized.
- Only Fully Applied - journal lines that are fully recognized and applied.
Also, set the Journal Batch filters to select which journals should be posted, in the Filter fastab.
If no General Journal Batches filters are applied, all Journal batches will be posted.
Setting up Bankfeed transaction Skipping from the journals
This functionality is used for bank transactions that the users do not want to post or upload to the Bankfeed journals because they have already been posted or because they do not want Bankfeed users to see them.
It consists of two parts:
- a setup that designates which transaction lines should be marked as “Skip Posting,”
- a setup that specifies what actions should be taken with those marked lines afterward.
A setup defining Journal lines as “Skip Posting”
Two setups enable skipping transactions. These setups are used if we have constant repeated situations with skipped transactions.
- The first setup is used to skip transactions consistently recognized by one of the Account Recognition Types, such as vendor payments recognized by "Credit transfer".
In that case, you can use the setup called "Recognition Config," which can be found on the "Integration Setup (Bankfeed)" page.
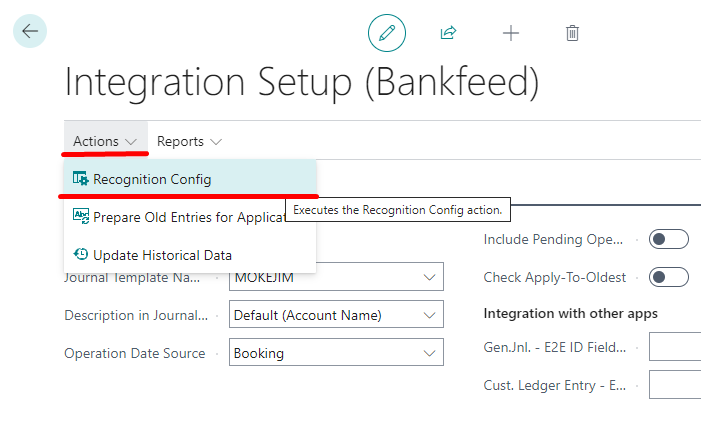
On this page, you can choose Account Recognition Types and select “Skip Posting” choosing what must be skipped: Customer, Vendor, Both, or Customer recognitions.
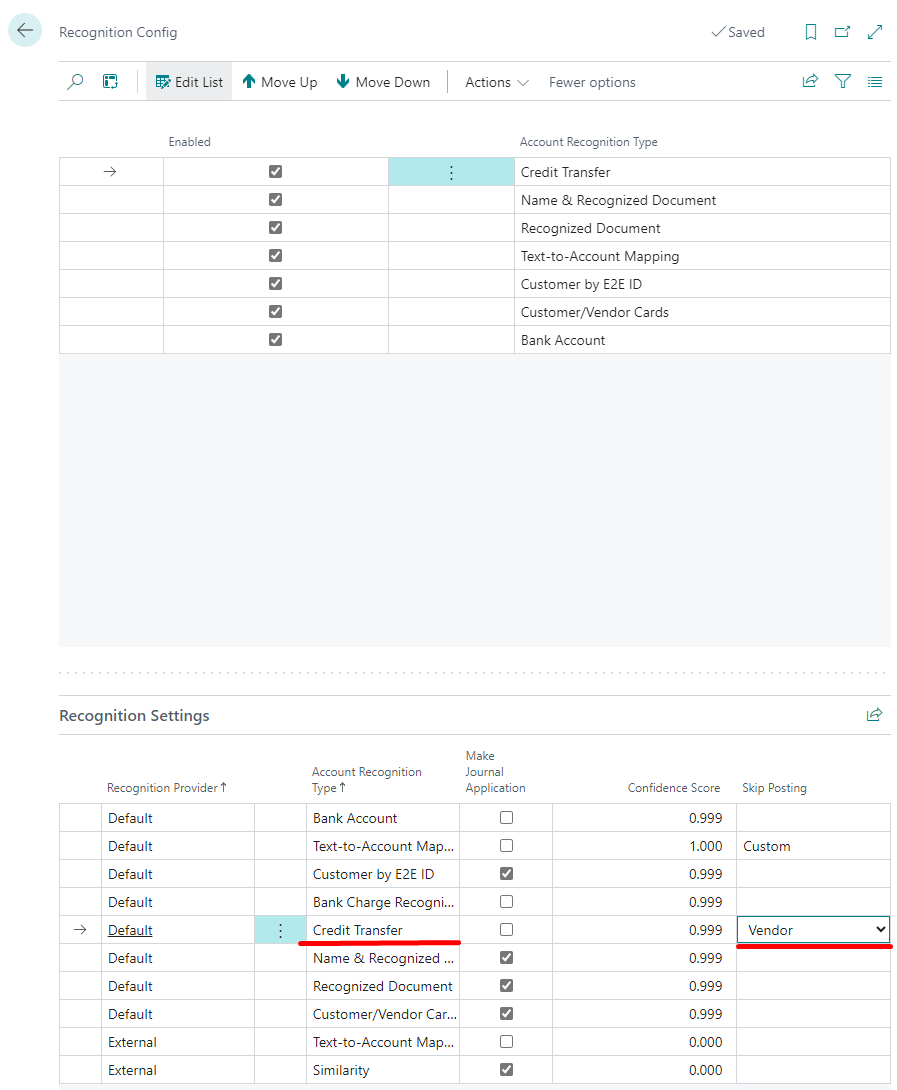
Journal lines where this recognition was made will be marked as "Skip Posting".
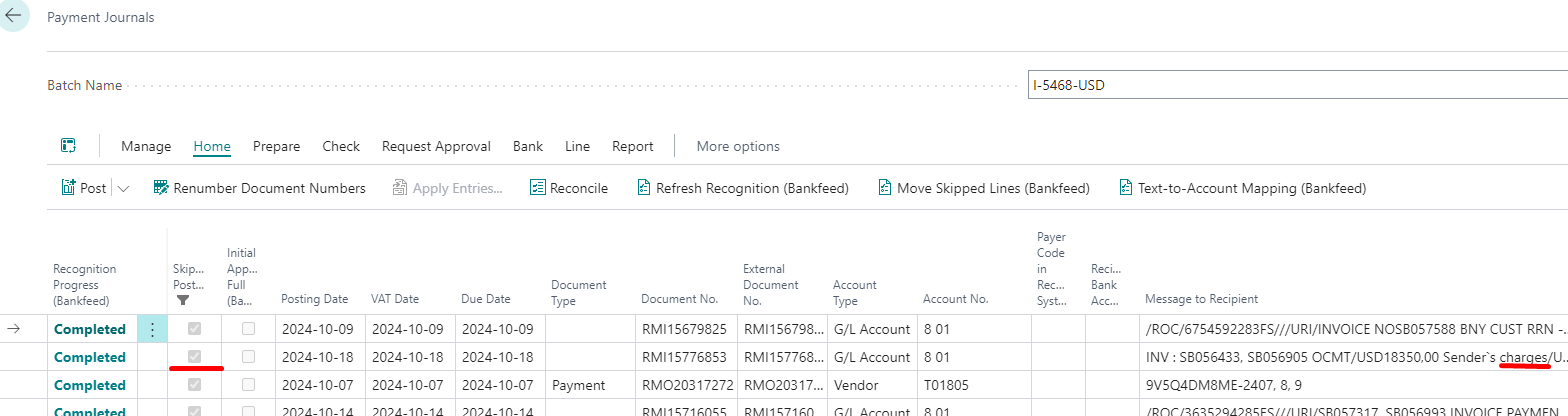
- Another setup is used for a transaction, which needs to be skipped and can be identified by repeated texts (“Text-to-Account Mapping (Bankfeed).”
Open the “Text-to-Account Mapping (Bankfeed)” page, enter the Mapping Text, and check the column “Skip Posting”.
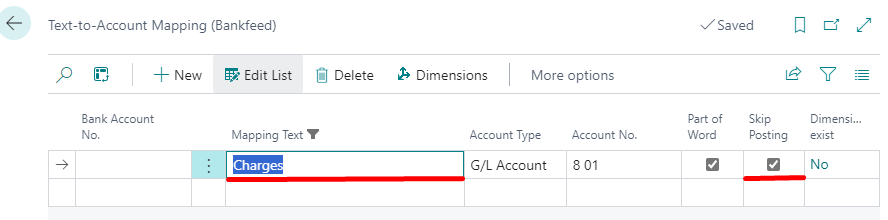
One example of using this setup is when we want to skip transactions with certain words. For example, “Salary” payments should always be skipped, as we do not want anybody to see them. Then this setup would be the most suitable.
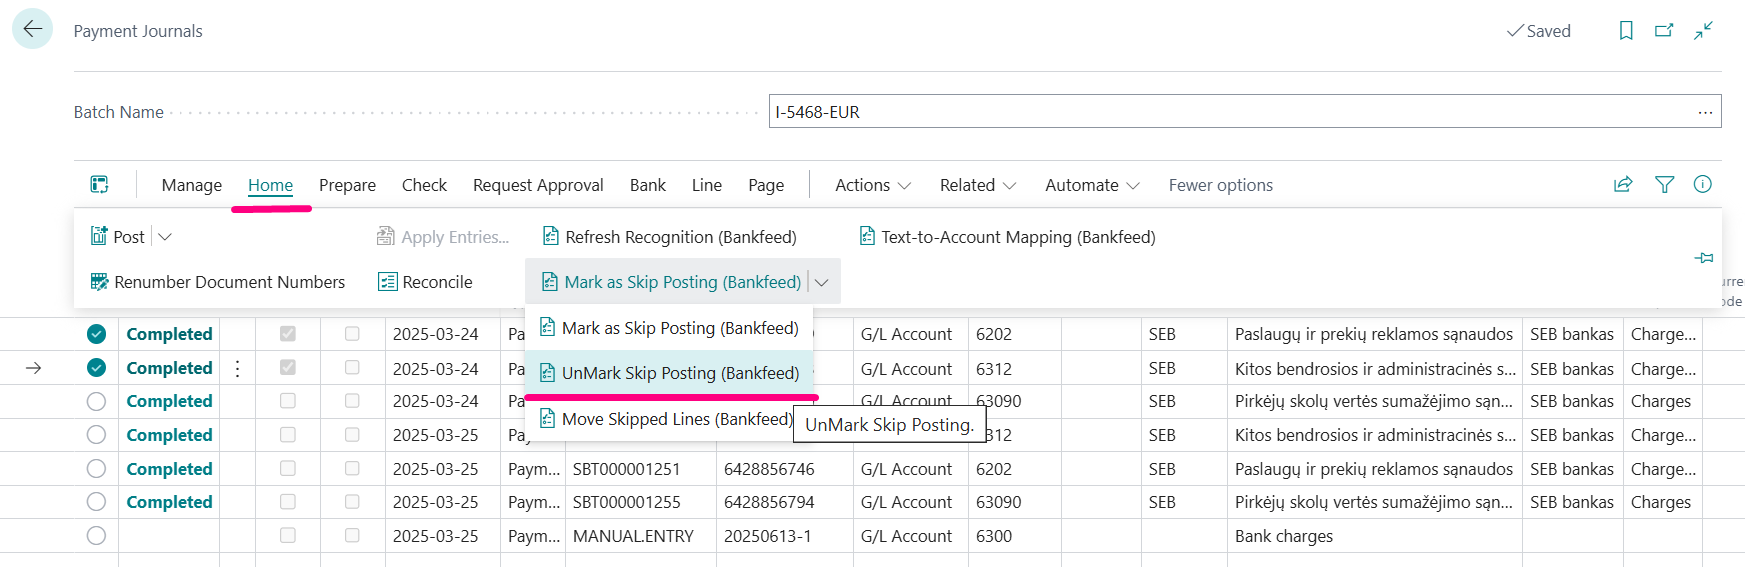
However, if we have rare situations when some transactions must be skipped, it can be done in the journal.
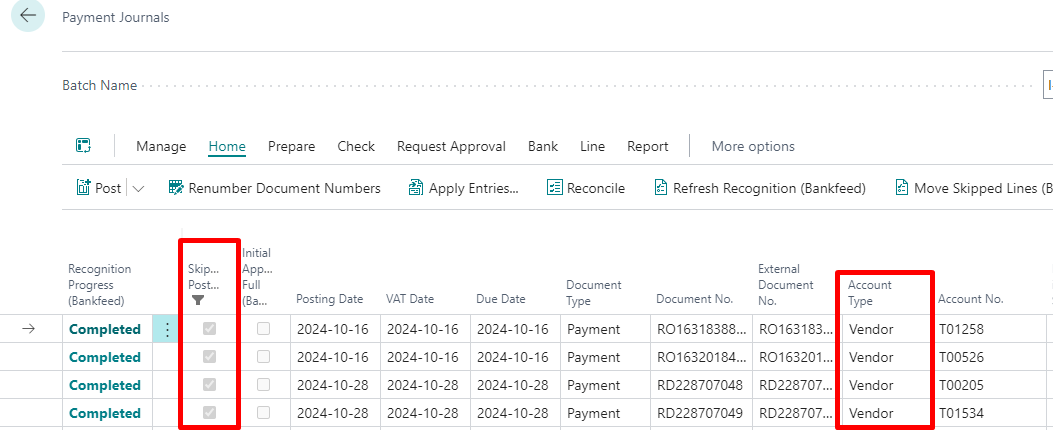
Mark the Lines you want to skip and click "Mark as Skip Posting (Bankfeed)".

Transaction can also be unmarked using function "UnMark Skip Posting (Bankfeed)".
A setup for the processing of “Skip posting” lines
In the first part of the setup, Journal lines were marked as “Skip Posting.” In this next stage, we will decide how to process these lines.
There are two options for handling Journal lines marked as “Skip Posting”:
- They can be automatically transferred to the Posted Statement Lines.
This is enabled in the “Integration setup (Bankfeed)” by selecting “Auto Move Skipped To Posted”.
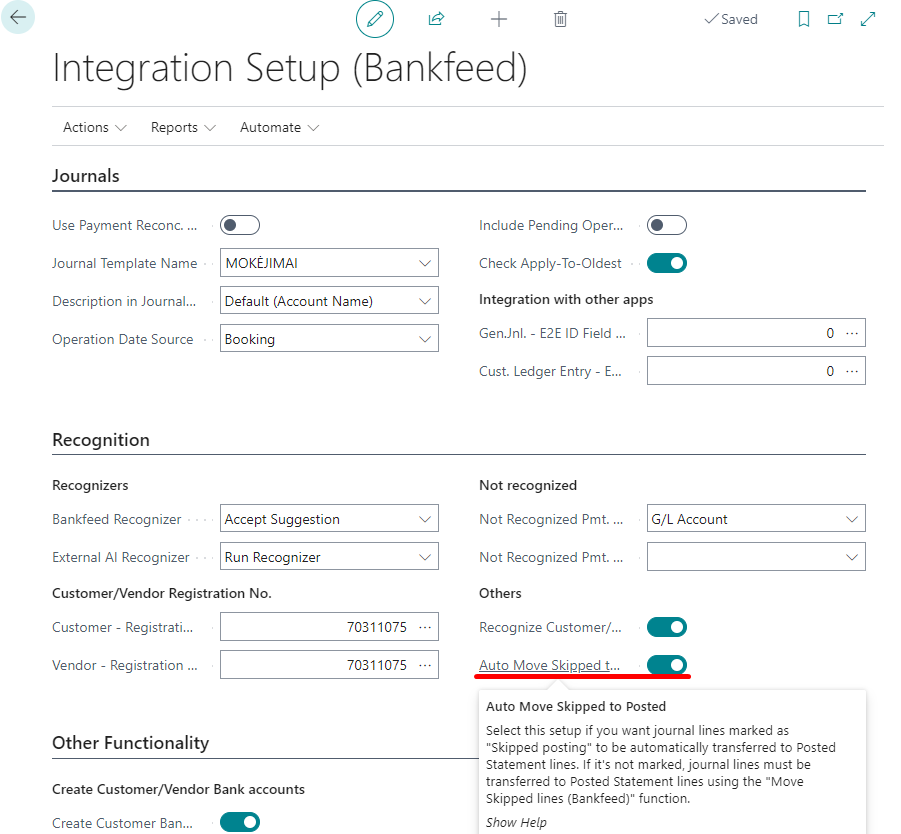
When this setup is on, in the Journal, you will not see the lines with “Skipped Posting,” as they will be transferred automatically.
- They can be displayed in the Journal and then moved to the Posted Statement Lines using a function.
All Journal lines, which are marked as “Skipped Posting” can be moved to Posted Statement lines by using a function “Move Skipped Lines (Bankfeed)”.
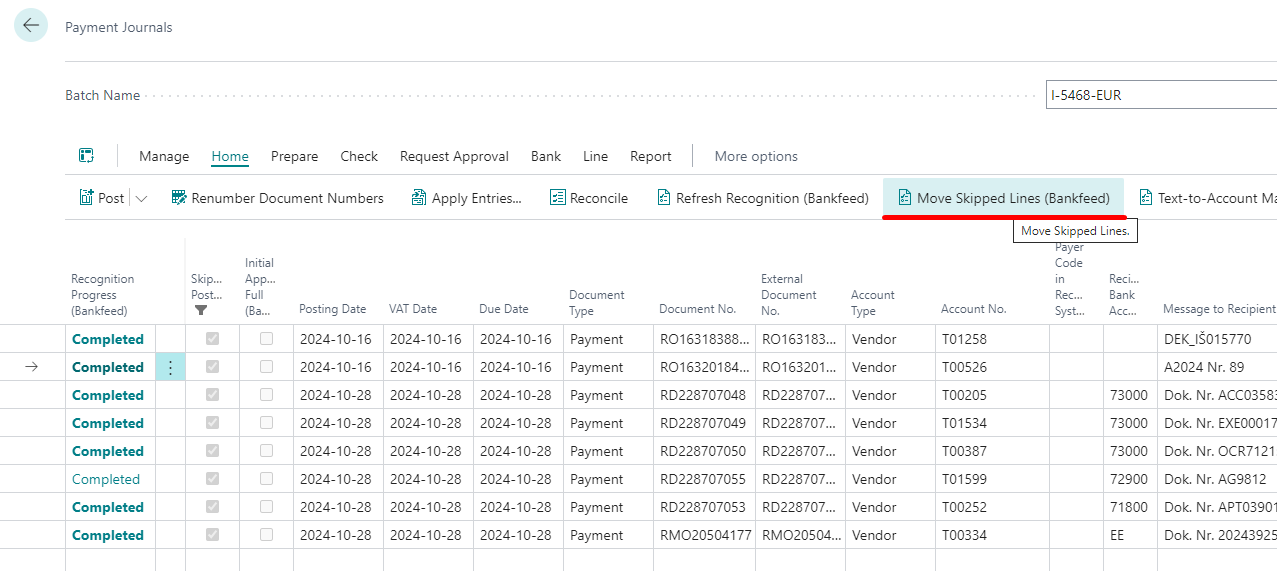
Running the function will move all Journal lines with “Skipped Posting” to “Posted Statement lines (Bankfeed)”.
If the journal lines with "Skip Posting" won't be moved to Posted Statement Lines using function "Move Skipped Lines (Bankfeed), they will be posted as normal lines.